Getting started with SFDX
Ever wanted to get into SFDX and using the command line? Its actually quite easy! The hard part is convincing yourself to stay in it for simple tasks.
Step 1. Install
Pretty simple here. Download and install the tool. I did this on Windows 10 pro and had no crazy issues! Pretty sure you can also just use NPM. In case you need it, here’s a link to the CLI setup guide. Just make sure you have a good code editor. Salesforce (and most coder’s these days) reccomend VS Code. There’s a metric ton of extensions for VS Code and Salesforce has some officially supported ones. Here’s the trailhead for how to get your extensions set up!
Setup 2. Set up a project
Figure out a place on your computer to store code. I have 3 folders on my desktop that I store code in (workrepos, freelancerepos and personalrepos). Quick tip, don’t put spaces in the folder names (use _ instead) and try not to use capital letters if you’re on windows. If you become a pro developer and start using Linux/Unix via WSL2 for some of your development it can cause frustrations (mostly just awkwardness) when using the command line for tasks. Now create a new folder in that spot you have chosen to house all the metadata/files your about to download from the org.
Step 3. Authorize an Org
Now to the real work! Let’s connect to an org. The easiest way I found is passing the instance url.
sfdx auth:web:login --setalias my-hub-org --instanceurl https://test.salesforce.com
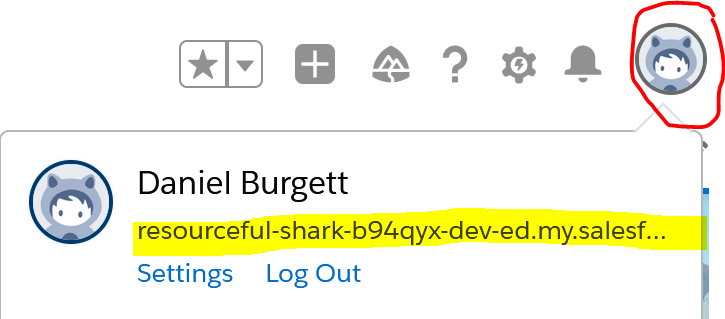
Don’t freak out if you get the ‘grant type not supported’ error. That just means your connecting to an org with a custom domain and have to change your url to match the actual instance url. You can get this by logging in to your org and clicking on your user icon in the top right corner.

Now try again with a modified url like so.
sfdx auth:web:login --setalias mySandboxAlias --instanceurl https://random-domain-somenumber.my.salesforce.com/
Step 4. Pull some data!
Now that we have accessed the org, we can pull data from it! Most likely you are pulling apex classes or lightning web components to your local to work on them, but you can also pull metadata such as profiles or flows. You can also do soql queries. Here’s an example snippet to pull a flow.
sfdx force:source:retrieve -m Flow:yourflowName -u sfusername
Step 5. Push some data!
Now if you want to push some changes back up to your org (or another org). You would use the force:source:deploy keyword like so.
sfdx force:source:deploy -m "Flow:TestScreenFlow1" -u your.username@random-generated-1234.com
Sometimes you might see a ‘=== Deployed Source No results found’ error/message in your terminal. This is because SFDX is not detecting any changes between your org and your local files, OR you are just not typing your command correctly and are pushing unchanged code, OR you forgot to save the file you are working on. Fear not! Usually this can be resolved by trying to deploy generically instead of specifically, using something like the following. Theres also been a few outstanding issues with sfdx not detecting changes.
sfdx force:source:deploy -m Flow -u your.username@random-generated-1234.com
Theres also been a few outstanding issues with sfdx not detecting changes. So you might just have to hack at google to find a specific answer to your issue. If you pushed successfully you should see a message like this in the command line.
*** Deploying with REST ***
Job ID | 1234ABcdEFg
SOURCE PROGRESS | ████████████████████████████████████████ | 1/1 Components
=== Deployed Source
FULL NAME           TYPE  PROJECT PATH
───────────────     ────  ──────────────────────────────────────────────────────────
someFlowIJustMade1  Flow  force-app\main\default\flows\someFlowIJustMade1.flow-meta.xml
Step 5: Profit!
From there the Sky is the limit! You can take that flow and deploy it to a differnt org (even one thats not connected to the org you pulled down from). You can change metadata locally, create scripts to bulk create data and more! Hopefully this was enough to get you started with SFDX!